
 By John Siers a.k.a. “Gunsmith Jack”
Just when you thought all of those cheap little pistols from the “Ring of Fire” era – the Ravens, the Lorcins, the Brycos, etc. were history… along comes the Phoenix. This pistol has been around for a couple of years but recently seems to have gotten much more popular. I’ve not only seen them on gun auction sites but also in the display cases at local gun shops. They may cost as much as $150 over the counter, but can be had online for around $100.
But other than price, why are these little guns suddenly so popular? I mean, seriously, what kind of gun would you expect to get for $100? And what kind of gunsmith would ever want to work on one when a simple clean-and-inspect would cost the customer half the price of a new-in-the-box gun?
Well, as some of you may have figured out by now, I’m a semi-retired gunsmith with a bit of spare time, a love for all kinds of guns, and a willingness to take on projects that may not be very profitable but are interesting and fun. In fact, I bought a Phoenix HP-25 from my favorite distributor specifically so that I could try it out, take it apart, and see how it works. I’m going to share what I learned with you, just in case a customer does bring one of these to your shop.
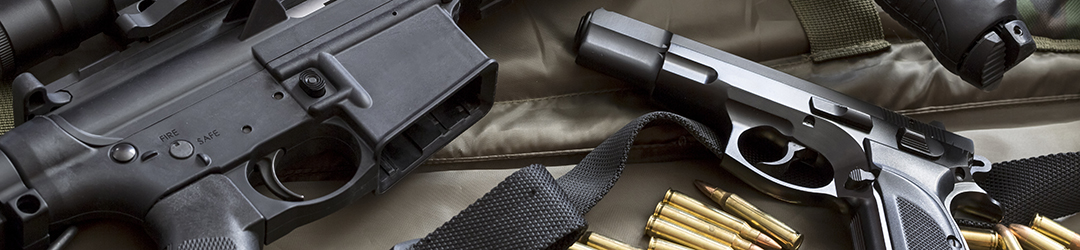
When I first opened the box, I had to admit that the Phoenix HP-25 looks a lot better than most $100 guns I’ve seen. The design is sleek and stylish, and the fit and finish look very good. Unlike most of the earlier cheap pistols, the Phoenix is a single-action hammer-fired design with an exposed hammer. There are two models out there at the moment, the HP-22 and the HP-25, and about the only difference between them is the caliber (.22 LR vs. .25ACP). There’s one minor difference I’ll mention later, but for the most part the two guns are identical and probably can interchange most parts without a problem. Speaking of parts, Phoenix is the only manufacturer I know that includes not only a complete parts breakdown but a price list for replacement parts in the Owner’s Guide that comes with each gun. Unfortunately, this may encourage a lot of amateur gunsmiths to work on their own guns; but the good news is that a lot of those wannabes may bring their box of parts to you and pay you good money to put the gun back together when they have problems with it.
In some ways, the Phoenix is kind of a different gun, even in the basic philosophy of how a semiauto should operate. It has some unusual design features that just might bring you some business. Customers may bring it to you complaining that it doesn’t work, when the real problem is a failure to understand how it’s supposed to work. When I worked in computer services, we used to call this a “problem between the keyboard and the chair.”
 For example, unlike a lot of the older cheap pistols, the Phoenix has a typical push-button magazine release located about where you would expect it on the left side behind the trigger. However, you can’t release the magazine unless the safety selector (also located about where you would expect it to be) is in the “Safe” position. This complicates any reload drill – especially since the Phoenix slide doesn’t lock back on empty. It does, however, have a manual lock-back feature… which again relies on the safety. You rack the slide to the rear and then push up on the safety (to the “Safe” position) to lock it back. If you want to impress the customer, you can explain the “Phoenix Reload Drill” which goes like this:
- Click! (gun empty)
- Rack slide manually and lock it back (by pushing the safety selector to “Safe”)
- Drop empty magazine
- Insert new magazine
- Release slide (safety selector to “Fire”)
Yeah, it’s one more step than you need with a Glock, but it’s the most efficient way to do a quick reload with this gun.
One other unusual feature: The Phoenix has a manually-operated firing-pin blocking safety.
“Say what???”
(Bet you haven’t seen one of those before.)
 But there it is, that little lever mounted up there on the left side of the rear sight (of all places). Push up for “Fire” and down for “Safe.” That’s all this safety does – blocks the firing pin. Everything else functions just fine while it is engaged. So… if the customer doesn’t read the manual and doesn’t know what that little gadget is for, we’re all set up for the “this gun doesn’t fire and I don’t know what’s wrong with it” scenario. These days, people go out of their way to buy guns that have no manual safety, so you really have to wonder why Phoenix chose to have two of them. Of course, the firing pin block does provide you with a (relatively) safe way to drop the hammer if you don’t want to carry it “cocked and locked” but then you would need to remember to disengage the F/P safety and manually cock the hammer before firing.
But OK… you can find out all of that from the Owner’s Guide. Let’s get into the actual “how it works” with a look at the insides. First of all, the basic teardown of the gun is… well, let’s just say “non-intuitive.” First, clear the gun as usual, clear the chamber and empty the magazine. Then put the empty magazine back in the gun, set the safety to “Fire” and cock the hammer manually. After that, push forward on the release latch (toward the front, under the slide, on both sides of the gun – see picture). This can be very stiff, depending on how new the gun is, but when you get it pushed forward, you then lift the front of the barrel and rotate it upward and out of the gun. Watch out because the recoil spring (which has no guide rod) will want to jump up and out of there. Just move the slide forward (which will relieve the tension on the spring) and lift that off as well. Then you can remove the spring along with the latch and plunger arrangement it attaches to.
 There you have it – the field-stripped gun (and if you think that was fun, wait until we try to put it back together again). Oh, yes… now you can remove the magazine.
At this point, I need to mention one other little quirk this gun has: as previously mentioned, you have to put the safety selector in the “Safe” position to remove the magazine, but once the magazine is removed you cannot move the safety to the “Fire” position, and that means you can’t move the slide, either. That’s why you have to reinsert the empty magazine and put the safety in “Fire” in order to field-strip the gun. We’ll see how all that stuff works when we get inside this little beast.
For the moment, let’s put the barrel, slide, and magazine aside and turn to the frame. We’ll start in the usual manner, by removing the grips. That’s a simple process – two screws on each side, all screws identical, nothing special. Like many other inexpensive pistols of bygone days, the Phoenix mounts a lot of action parts directly under the grips and relies on the grips to hold them in place. Take care that none of these fall out when you remove the grips (or if they do, make sure you know how to reinstall them). The disconnector on the right side is the first and most likely drop-out candidate, but the safety selector on the left side can come loose as well.
 A word about the frame: it would be nice if I could say this gun had a steel frame, but doesn’t. I’m not a metallurgist, but the frame is not magnetic and is too heavy to be aluminum. I’m guessing that it’s made of Zamak – the injection-molded zinc alloy that was used for all cheap pocket pistols in days gone by. That’s not a big deal for a gun that costs less than $100 and is not expected to last 100 years.
In fact, since these guns are not made in calibers larger than .25, they should hold up pretty well if properly cared for. It does explain why (as you can see in the picture) most of the inner parts are pinned in place using roll pins rather than solid pins. The alloy is obviously a lot softer than steel and solid pins would probably work loose over time. If you need to drive any of these pins out to repair the gun, I would recommend replacing the roll pin as well.
 Very little of the fire-control group is actually “inside” the frame – just the hammer, the sear, and the trigger itself. The mainspring that drives the hammer (via a hammer tail) is conventionally located in the backstrap of the frame behind the magazine well (see picture). The remainder of the fire-control components – disconnector, trigger bar and safety – are outside the frame and easily accessible with the grips off.
The disconnector is fairly typical for guns of this type. When the slide cycles, it pushes the disconnector down, and this pushes the trigger bar out of engagement with the sear. The two pictures below show how this works. On the top, the disconnector is up and the trigger bar engaged. Below, down and disengaged.


(To Be Continued–Look for Part 2 of this article soon!)
Leave a Reply